Google

Friday, 18 July 2008

Mitsubishi Pajero

I post this article originally for my other blog the 4WD-fourbyfour.blogspot.com , however I think this article also relevant for this blog.

The Mitsubishi Pajero is a sport utility vehicle manufactured by Mitsubishi Motors. It is known as the Mitsubishi Montero in the Americas and Spain, and as Mitsubishi Shogun in the United Kingdom. In this post I would like to discuss the third generation Shogun/Pajero (1999 - 2006) with 3.2 liters diesel engine.


Mitsubishi Pajero is one of few real off-road workhorses, in the market it has competitors like Toyota Land Cruiser, Nissan Patrol and Jeep Grand Cherokee. Although the has superb exterior and interior design, Pajero can’t compared to the premium brand likes Range Rover or BMW X5, Pajero is thougher, real workhorse with bullet proof engine.

Pajero brief fact:
- Engine: 3200 cc four-cylinder diesel
- Output: 158 hp at 3800 rpm
- Torque: 275lb ft at 2000 rpm
- Transmission: 5 speed auto
- Fuel consumption: 26 MPG
- Weight: 2155 kg
- Top speed: 106 mph

Engines and Performance
The Pajero 3.2-litre direct injection diesel produce 158 bhp and 275lb ft torque. Although the power is slightly less than its competitor, however the high torque made Pajero is more flexible. The engine bit noisy, especially from the outside. While power is on the low side, the engine delivers tons of torque at under 4000 rpm, good for off-road driving and climbing steep grades. Fitted with Mitshubishi’s new INVECS-II five speed auto transmission, the Pajero has optional fully automatic mode or sequential manual shift. The quality of the automatic change reduces the temptation to use the manual option, although it can come in handy for accelerating hard out of junctions. The manual changes would benefit from being less hesitant.

Ride and Handling
In the asphalt road Pajero is quick and comfortable, body roll appears during cornering. The steering is good, its accuracy and a relative quick rack helping you make correction off road. As the result of fitting a multi link rear axle, Pajero lack of ground clearance. The traction system was rarely problem. The four-wheel drive system is switchable, operating as rear-wheel drive under normal conditions. The Pajero off road capability slightly less than its competitor Toyota Land Cruiser. The Pajero's soft suspension is generally forgiving and smooth on the highway. Road feel is never very lively in 4x4s, but the Pajero's rack-and-pinion steering is a big improvement over the previous model's setup. Road and wind noise make an appearance at moderate highway speeds. Cornering response is predictably ponderous, with pronounced side-to-side roll. Let's just say cornering quickly with the Pajero is not a very good idea. The Pajero features big ventilated disc brakes front and rear, necessary to haul this truck down from highway speeds, and they work adequately well in conjunction with ABS.

On rippled gravel surfaces, the Pajero exhibited little bounce thanks to the Pajero's fully independent suspension. Mitsubishi's compliant springs and shocks soak up most of this motion, producing a very smooth ride during mild offroading. Mitsubishi also does away with the classic body-on-frame construction of most 4WDs and opts for a unit body construction. This generation of the Pajero is the first to be built on a unit body, ditching the older body-on-frame design while also leading to a stronger structure that does not rattle over bumps. On really steep descents and climbs, the Pajero's torquey V6, low-range transfer case and brakes work together superbly, allowing good control when going downhill and providing plenty of torque for climbing back up.

Interior and Driving environment
The cabin is not complicated, is comfortable, robust and roomy. The quality is moderate. Pajero has seven seats. The third row of seats fold out of the floor, a neat system that creates valuable spaces when the seats are not in use. The shogun’s boot is narrow and tall, although with the rear seat folded it’s more usable. Driving position is good, visibility is excellent. The design of centre console is modern, however the fake wood in the dash look ugly. The Pajero dials composition and design is out of date.

Tuesday, 15 July 2008

LWB or SWB 4WD?

After 20 years using various 4WD vehicles in various terrain, a basic question arise; which one better, short wheel base (SWB) or long wheel base (LWB) 4WD?

1. In muddy road:
A light weight short wheel base vehicle like Suzuki SJ410 is the best for this kind of terrain. The Suzuki will “float” above the mud. Some times a medium weight long wheel base vehicles like Defender 110 or Daihatsu Taft Hiline LWB are also good for this road. The muddy road condition is always not homogen, the opportunity to get hard ground is better with a long wheel base 4x4. The full size 4x4 likes Toyota Land Cruiser and Nissan Patrol will become the first vehicle stuck in the mud.

2. Gravel road.
LWB vehicles will give a better ride in this condition as long as the rocky road is not to rough. Riding a SWB 4x4 in this terrain will make your back pain getting worst.

3. Sandy dessert.
Both LWB and SWB are ok for this terrain. If you driving fast, LWB is better, more stable compare to the SWB vehicles

4. Rocky road
In this condition, a SWB vehicles with high departure and overhang angle will give an advantage to pass a rough rocky road. Suzuki SJ410, Wrangler Jeep and Toyota FJ40 will meet this qualification.

5. Steep hilly road.
The stability of LWB vehicles will take an advantage in this condition, especially when downhill.

For myself currently I choose a 4x4 to compromised all terrain above, Jeep Cherokee XJ. The wheel base is not short like Wrangler or SJ410, but still shorter than Land Cruiser or Nissan Patrol. With 32” tire, I can manage almost all obstacles and still feel comfortable while driving.
So, what 4wd vehicles wheel base is good for you?

More articles in 4wd tips are available in my other blog: 4WD-fourbyfour

Wednesday, 2 July 2008

Honda CX500 CDI Schematic (2)

Ok, lets continue my previous post about the Honda CX500 schematic.

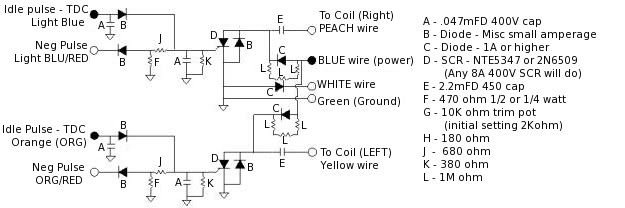
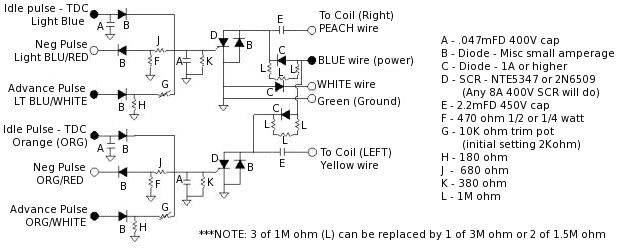
As before, this post refer to old posting by George in NC. He made two CX500 CDI prototypes and I've tried to made the second prototypes and its works!!. I made it twice, the first one was works for more than 3 years and the second one works for one years, its failed at the same time with stator/rotor problem (see my first posting about Honda CX500 by clicking here).

And here what George in NC wrote:

Section II: The Prototypes
Prototype 1:
    Properties:
  • it works
  • it's the simpler of the two
  • no timing advance
  • max revs are roughly 6500-7000rpms
  • bike runs rich when this iginition is used
This one will get you home or make a good test unit, but I wouldn't want to use it as a permanent solution...


This is a good example of Prototype 1. The input leads (LtBlue/Orange) are coming in from the left and the Blue and White leads are coming in from the right. You can see that there are two SCR's (one for each side). You can also see that the two capacitors/sides have thier own power input from the Blue wire lead. There is a diode that you cannot see located under the top brown capacitor. The two electrolytic capacitors are the 2.2mFD 450V capacitors. To the right are the 'C' diodes....


Prototype 2:
    Properties:
  • it works
  • it's the better of the two
  • timing advance
  • max revs are same as original
  • bike runs well when this iginition is used
  • this ignition requires tunning of varistor 'G' to work correctly
This iginition is alittle tricky because of the tuning required for it to work correctly. My best suggestion is to use a varistor that is about 2000 ohms and start the bike with it set to 2000 ohms. Once the bike is started, slowly reduce the ohms until the bike starts to falter...then turn the varistor back half the distance. This needs to be done for each side. I have had the varistor at both 0 ohms and 2000 ohms and have had no ill effects to the engine so don't be afraid to play around.

There is one thing I would like to change on this schematic when possible. The 'Positive Supply/Blue' should be the same as in Prototype 1. Each capacitor should have it's own diode resistor set without the connection between the two 'L' connectors.


Here is a pcb board for the whole layout...the one on the left is the whole pcb, the one on the right is just the silkscreen for the actual copper layout (so you can print it off and use it as an overlay).


For those wanting to get a general idea of what to expect price wise, here is a list of components I bought to build the CDI boxes...

These prices are really old data from http://www.digikey.com/ and may have changed. You can check all of that out on their online catalog...
Part # # description Price $US Totals
P5873-ND
2
2.2microF Radial Caps
$0.87
$1.74
E4473-ND
6
.047microF Metal Poly Caps
$0.50
$3.00
E4153-ND
2
.015microF Metal Poly Caps
$0.43
$0.86
470QBK-ND
10
Resistor 470Ohm 1/4Watt Carbon Film
$0.06
$0.56
680QBK-ND
10
Resistor 680Ohm 1/4Watt Carbon Film
$0.06
$0.56
390QBK-ND
10
Resistor 390Ohm 1/4Watt Carbon Film
$0.06
$0.56
2.7MH-ND
5
Resistor 2.7MOhm 1/2Watt Carbon
$0.06
$0.27
1N4004GICT-ND
20
Rectifier 1A 400V DO-41
$0.04
$0.80
S4008V-ND
2
SCR Non-Sensitive Gate 400V 8A TO-251AA
$0.77
$1.54
3306P-103-ND
2
10kOhm 6mm RD CERM ST POT
$0.57
$1.14


Total
$11.03


Handling Charges
$5.00


Shipping
$4.00


Total Invoice
$20.03
eventually swapped the 10kOhm ceramic pot for a 2kOhm variable resistor. The 10kOhm worked fine, but I wanted to use something smaller.
The wires I used for the prototypes was either 20 or 22 gauge solid wire. In fact that is the wire I have been using through this whole process and it seems to work fine. The connectors I use are the standard automotive type and they work as well.
A PCB kit from your local Radio Shack is about 15.00$US and it has most of what you need. The only other thing you might want to get is a set of Radio Shack's stencils for making the diagram/layout on the PCB. They're realitively cheap and make a MUCH better/cleaner board.
There is also the cost of the soldering iron and solder. If you've never soldered before then you need to search on the internet for some sort of tutorial. There are some out there, that's how I learned...that and practice.
Many thanks to Goerge in NC who wrote this article long time ago. I wonder, does anyone know George current e-mail address, it will be nice if we can discuss about honda CX500 with him.

Note: my PC crash last year and I lost the original schematic files, I apoligize can't send bigger picture anymore.


update:
one of this web visitor give a link for the picture, thank you for RHCE V6.....
RHCE V6 said:
Here are the schematics.

1. this is a very basic circuit that will get you running but has no advance so RPMs are limited to ~6K-7K

http://i1186.photobucket.com/albums/z370/rhcev6/CX500CDI/NO-Advance.jpg


2. this is the full CDI with advance cuircuit. You can set the trip pots initially at 2Kohm and then adjust as needed above 6K RPMs

http://i1186.photobucket.com/albums/z370/rhcev6/CX500CDI/Full-CDI.jpg