Google

Wednesday, 30 November 2011

Maxxis Trepador;.....25.000km later

After used the Trepador for approximately 25.000km in 22 months, here the review:

Uses: 75% road (asphalt, concrete) and 25% off road (gravel, muddy)

Confortable for daily use in the first 6 months, after that the tire start produce noisy sound, after 16-18 months the tire start cupping, and resulted a excessive vibration and shaking especially in low speed.

Trepador shows a good performance in the off road condition, especially at muddy road.

Current main issue: tire cupping and high noise in asphalt and concrete road.

What next: I'll keep this tires (including the wheel) for a while, maybe another year, for off roading purpose only . For daily use I'll usel a new wheel with 16" or 17" ring and installed a H/T tires (high way type) with the same diameter with my old Maxxis Trepador.


Tuesday, 29 June 2010

Honda CX500 update; crash bar and radiator plate

During continued electrical testing (cdi, stator, rectifier, etc), I'm also order some items from ebay and local shop. And installed to the plastic maggot, here the pictures.....

New (not really new ...order from ebay.uk) crash bar, radiator shroud and new Yuasa battery ...... perfectly fit  :-)


Picture from another side:


Friday, 18 June 2010

Honda CX500 update; Electrex Stator

Actually I did this update at 2009.
After some internet studied, I bought G47 stator from Electrex UK. I have very limited reference for my CX500, this is the only one CX500 in my country...., just guess my CX is a A or B type.

The Electrex G47 stator arrived on time, in very nice package......


And I start to dismantle my engine..........
Oooooppppss.................
The stator looks difference in shape and wiring.......


Any  idea, what type of CX500 is that?.....


MAXXIS Trepador for my ZJ Jeep

After upgrading my Grand Cherokee ZJ Jeep suspension (I haven't wrote it yet.......next post), including lifting my ZJ suspension 3", the next thing to do is replacing my old Dunlop Grantrek A/T with something M/T. I'm almost out of budget, so I can't effort BF Goodrich M/T KM2, too expensive. My options are: Bridgestone Dueler M/T, GT Radial Savero, Kumho (I'm not sure about quality), Federal Couragia and Maxxis Bighorn or Buckshot Mudder. Most all the time I'll use this car for on-road driving (80%), and once a month go for camping or adventure off-road  in the mountain. Due to my limited budget and space, I can't prepared 2 set of tires.


I'm familiar with bridgestone dueler M/T, the quality is good, and I'm also satisfied with its performance in dirt road.In tarmac and concrete road, ....hmmm noisy, and the model looks so old.. Federal Couragia is a new model available in Jakarta, however only few shops sell this tires, the tread pattern really impressed me, even though I don't know yet how its performance in dirty road or muddy road.

After visiting one tire shop who sell bridgestone and GT Radial, next destination is Maxxis tire shop. Actually I'm looking for Maxxis Bighorn or Buckshot Mudder. Bighorn tread pattern looks aggresive, and the buckshot looks very similar with Bridgestone M/T. Then my eyes stuck with Maxxis Trepador Radial, the tread patter really impressed me. Here the picture:


well, ....how do you think?
The price slightly higher than Bighorn, ......according to the seller, this Trepador is more silent in asphalt road than bighorn or buckshot mudder.
This Trepador also have better grip in muddy road compare to Bighorn.

Here the factory description about Trepador:
  • Unique tread element arrangement ensures a uniform tread contact area for sure-footed handling.
  • Multi-stage staggered shoulder pattern provides improved control even on the most difficult off-road and rocky terrain.
  • Nylon belt-reinforced tire construction improves puncture resistance and prolongs tread life. 


So....., I choose Maxxis Trapador for my ZJ Jeep, the size is 31" x 10.5 R15. It cost Rp 1.450.000,- for each (approx. US$ 157)


How the Trepador performance for daily use?..... I'll post the my experience with  Maxxis Trepador next month.


Thursday, 10 June 2010

ZJ Project: front drive shaft replacement, CV to U-joint

As stated in many web sources, the front drive shaft ZJ jeep, Constant Velocity joint type (CV joint) is one of the ZJ weakness point, is easily broken, especially in off road daily used. It also happen with my ZJ, the CV joint start to wobbling, especially while driving above 60 km/m. This CV joint is not fixable, one its broken, you should replace with a new one, which is cost you around 350-400 bucks, and the same problem will come again after few years.

After some discussion and internet research....:-), I went to workshop and they offer me to replace the original CV joint with used Universal joint taken from cherokee country. They said that U-joint will fit properly in ZJ jeep. I saw many broken ZJ CV joints in that work shop, that mean my ZJ was not the first one. It cost only around $125 including installation cost.
Here some pictures of it:

1. broken CV joint


U-joint front drive shaft, taken from cherokee country (looks dirty...and not good...:-) ...).


The U-joint have been installed in my ZJ, just fit......


Tuesday, 8 June 2010

Add 3cm tire spacer to my Grand Cherokee ZJ

Last year I added 3 cm spacer to my grand ZJ, the main function of this spacer is to prevent the front tire (installed with 31" tire) rubbing the lower control arm when turning. The other function..... made the ZJ looking better...he...he, depend on your taste.....


The installation is simple, less than 30 minutes for all tires. Why only 3 cm? Because 3 cm is thick enough, strong enough, not easy to brake. With 3 cm spacer will not affected the wheel axes, minimized pendulum effect (compare to thicker spacer) and no need balancing before installation.

So, my front tire not rubbing lower control arm after I installed the 3 cm spacer, however..... a new problem rise, the front  tire rubbing the lower part of plastic bumper when turning......he....he, just cut it a little bit.


My Grand Cherokee ZJ problems.

My Grand Cherokee ZJ spec (2009 status):
Manufactured : 1998 (the latest model)
Engine : 4.0 litre I-6
Trim : Laredo
Modification :
- lift 2”
- 31” tire
- After market shock and coil springs (OME)
- After market sound system.

List of problems and solutions:

  1. Front ring and pinion failed at 9,000 km. Symptom: noise from front differential. Solution: change the ring and pinion with the higher spec. This problem was common for latest version of Grand Cherokee ZJ.
  2. Air conditioner evaporator leaking at 25,000 km. Symptom: lost of refrigerant, AC not cold as used to be, the compressor clutch on and of frequently. Solution: inspect the evaporator, clean it. Found a big hole in the evaporator, could not be repair, then change the evaporator. Note: the evaporator made by Zanden, the size is relatively small compare to ZJ interior volume. The evaporator was located under the dash board, to uninstall it you need to remove the dashboard first.
  3. The master power window and central lock (on driver side and later all doors) failed. Symptom: completely failed, no button functioning. Solution: 1. Check the 30A fuse on the power distribution center under the hood, take it off and then put it back again. Usually the power window will work again normally. For better solution: make an on-off switch between the power window and the fuse, and turn off the electric charge when it not functioning. It is a common problem in Grand Cherokee ZJ, a continues electric supply to the central power window and central lock unit can make the system failed. 2. If the central lock still have problem, check the actuators, and replace it. If the original cost you a lot, find the after market central lock motor, its really cheap (made in china :-) ), around US$ 10 to 12 each and can work at least for 3 yrs.
  4. Air Conditioner compressor failed at 38,000 km. The symptom almost the same with number 2, however usually the AC works fine at the beginning and failed after 1 hour trip (when the compressor reach its normal work temperature). Solution: Inspect the AC compressor, check for leaking. In my case, I open the compressor, overhaul it, and found most of the piston have been scratch badly, and some parts of the clutch have been damaged. I change the compressor completely. Note: My original compressor brand is Nippon Denso (ND), it is weird because the evaporator is manufactured by Zanden.
  5. Transmission high pressure hose leaking at 47,000 km. This is the high pressure hose from the tranny to oil cooler, leaking on the oil cooler side. Symptom: oil leaking and then dripping from the hose, loosen transmission oil, when the condition become worst, the automatic gear can jump suddenly to neutral in normal driving condition. Solution: change the high pressure hose, add the transmission oil. Note: to check your ZJ transmission oil level, park your car in flat area with engine running, move the gear lever to N and check the level using a dip stick.
  6. Engine misses throughout driving speed range starting at 51,000 km, the jeep engine misses in high rpm (i.e. above 2000 rpm). This problem occurs especially when driving a long trip. Solution: clean up the fuel tank, clean the fuel pump. Replace the fuel filter. Note: for my ZJ the fuel filter located inside the fuel tank, for pre 1998 ZJ, fuel filter located outside the fuel tank (more simple and easy to replace).
  7. Death Wobble, occur several times after I lift my jeep 2” and changed the stock tires with 31” tires (see my previous post). Solution: proper wheel alignment. Note: after did a wheel alignment, the DW is gone, however the steering still not back to normal as an original setting, need more suspension up grade (see my next post)
  8. CV joint front drive shaft is prone to be broken after few years, replace with Universal joint front drive shaft, taken from XJ country jeep or after market product.

The rest are minor problems, like death battery, dirty power window motor. Generally the I-6 engine is very reliable and low maintenance.

See my other post about my ZJ compare to the Japanese 4wd in Cars and Bikes site.

Lifting the Grand Cherokee to fit 31” tire.

To fit 31” tire in ZJ Jeep required body lift around 1.5” to 2”. There are plenty of suspension lift kits available in the market. Before lifting the jeep, please check the front drive shaft type, if your ZJ equipped with U-joint drive shaft, it is save to lift the body up to 2”, but if the ZJ equipped with CV-joint front drive shaft, please do not lift the body more than 1.5”. To gain 1.5” to 2” body lift, we can use:


Budget Boost / Polyurethane Suspension Lift.This is the cheapest way to gain 1.5 to 2” lift, just add polyurethane spacer on the top of the coil spring. Usually the spacers sold together with bump stop extension. For this method will cost around 60 dollar up to 150 dollar.


Change the suspension system with taller coil spring.There are many suspension products are available on the market, one of them is Old Man Emu brand (picture above) manufactured byARB. The Old Man Emu suspensions are not typically noted as a lift kit. They are usually regarded as suspensions systems. However, depending on vehicle weight and application, a lift of 1-1/2" to 2-1/2" can be gained. Many lift kits require a sacrifice of ride quality for off-road performance, but Old Man Emu is able to combine both to give outstanding ride quality with excellent spring articulation. Old Man Emu recommends using 31" tires for best performance. This suspension system will cost around 500 to 700 US dollar.
Combination of the above system.
This is what I did with my ZJ. After installed the OME spring and shock, the 31” tire still rubbing the fender. I suspect that the installation of the new OME spring and shock have not reach 1.5” lift as their claimed. So, I added ¾” polyurethane coil spacer (cost me 59 USD, bought from 4WD store) and the tire just fit, not rub the fender anymore. However, the tire still rubbing the front lower arm in the maximum turn position. To avoid this, we can add a wheel spacer or reduce the maximum wheel turn through an adjustable bold.

The pictures below showing the ZJ jeep with 29" stock tire and with Dunlop Grantrek A/T 31" new tires.


So what we got after installing 31” tire?
- Higher ground clearance
- Better look
- Plenty options of tire type (HT, AT, MT, super swamper, etc.)

Notes:
- Don’t forget to re-align the will after installing the lift-kit
- After one year using the OME system in normal road driving condition, I feel the shock absorber going weak, this is much shorter life than I expected. In near future I have aplan to change the OME shock with Pro Comp which is much cheaper with almost the same quality. 

- Further observation, actually the shock wasn't weak, but the bushing start to worn due to change of suspension geometry. This problem made the the jeep sway and some noise start.


Friday, 15 August 2008

Motorcycle Stators - What Are They?

After struggling with my Honda CX500 stator, I'm bit curious about this electrical thing. Then found this article from Electrosport.


In simple terms, a stator can be defined as the stationary part of an alternator. In order to understand what the stator does, it is helpful to know how a basic electrical system works.


The electrical system on most vehicles includes a way to generate, store, and use electricity. An alternator generates power by producing AC (alternating current). Alternating current is often used exclusively to power halogen bulbs, tail lights, and some ignition systems on mopeds, dirt bikes, and ATVs. Any motorcycle that has a starter motor must also have a battery for powering it. Batteries cannot store AC current; therefore current must be converted into a storable form known as DC (direct current). A component known as the regulator/rectifier performs this conversion. The rectifier actually converts the current from AC to DC, while the regulator keeps the power level (voltage) from going above the 13.8 -14.5 volts needed to power a standard 12 volt battery. It is important that the stator provides more power than needed by the motorcycle so that the battery will stay charged. If the motorcycle uses more power than the stator can provide, the battery will start to drain. This will typically happen if the voltage drops below 13 volts.

A traditional alternator uses a coil that uses DC power from the battery to produce a magnetic field. This coil is wound on a spool and is sandwiched between two metal flywheels with fingers of metal that alternate from one side to the other. When this coil is powered, it makes each finger have a magnetic field. These alternate with each finger between north and south pole. As this assembly spins, the alternating poles of magnetism energize the outer windings of the alternator to produce AC power. The benefit to this type of system is that it can produce more power at lower engine speeds which is why most cars and trucks use this system. The down-side to this system is that it requires a charged battery to work. Motorcycles often require a lighter weight system that can produce power with no battery installed or with a small battery. This requires a slightly different way of making power.

The alternator on a motorcycle or ATV converts kinetic energy (power of motion) into electrical energy to charge the battery. An alternator is made up of two parts; the stator and the magnet rotor, also known as the flywheel. The rotor or flywheel contains permanent magnets and spins around the stator to produce energy. Energy use varies from motorcycle to motorcycle and as a result, individual stators may differ. Some stators produce AC power for the ignition system only while others produce AC which is then converted to DC for powering lighting, ignition computers, fuel injection, etc.

Stator designs vary widely but all work on the same principles. When a magnet is moved past a coil of wire, it causes the coil to produce a burst of electricity. A stator has between four to eighteen spokes or poles arranged in a circle similar to the spokes on a wagon wheel. These spokes have an iron core made of a number of thin plates stacked on top of one another. Each spoke has copper magnet wire wound around it. Some stators use a single coil spread across a few poles while others use a few coils with different windings and wire sizes on a single stator.

Still others are split into three evenly divided sections called three-phase, used for high powered output to be converted to DC. Three-phase stators are easily recognizable by three yellow or white output wires. The winding, length, and diameter of the copper wire is customized to suit the power requirements of each motorcycle, as well as optimize the ignition system's power output and starting capability.

Some stators include a pulser or pickup coil. This small coil is mounted separately to the motor or to a mounting plate, allowing it to sense the crank angle via one or more small bumps on the outside of the flywheel. The coil must be placed between 0.02 and 0.50 mm away from the highest part of this bump or "trigger". The input from this coil is sent to the ignition computer (CDI), where the spark timing is calculated. Some CDIs are powered with AC power from a specific coil, called a source coil, which is wound with fine wire. Other CDIs may be powered by DC current produced by a stator, regulator/rectifier, and battery combination. The current from the CDI is sent to the ignition coil and magnified to over 10,000 volts. It is then sent to the spark plug.

Most of our stators include a full wiring harness allowing for easy installation. It is important to note that we often include upgraded features on our performance stators, and as a result, these stators may look slightly different than the OEM units. In addition, some of the testing procedures used for OEM stators may not apply to our parts due to optimized windings.

SAVING GAS TIPS

This issue "popular" again,

ENGINE WARM-UP

1. Avoid prolonged warming up of engine, 30 to 45 seconds is enough (even in winter time), for old car (more than 6-7 years old) probably needs a bit more time (1-2 minutes)

2. Check/listen to the rpm idle, be sure the automatic choke is disengaged after engine warm up.

3. Don't start and stop engine needlessly. Idling your engine for one minute consumes the gas amount equivalent to when you start the engine.

4. Avoid "reving" the engine, especially just before you switch the engine off; this wastes fuel needlessly and washes oil down from the inside cylinder walls, owing to loss of oil pressure, this process also can damaged your turbo system if equipped

5. Eliminate "racing type" starts. Accelerate slowly when starting from stop, at least for the first 200-300m.

BUYING GASOLINE

1. Don't let your fuel tank close to empty, empty fuel tank store more fuel vapour and increase pressure in gas tank

2. Buy gasoline during coolest time of day - early morning or late evening is best. During these times gasoline is densest. Keep in mind - gas pumps measure volumes of gasoline, not densities of fuel concentration. You are charged according to "volume of measurement".

3. Choose type and brand of gasoline carefully. Certain brands provide you with greater economy because of better quality. Use the brands which "seem" most beneficial.

4. Avoid filling gas tank to top. Overfilling results in sloshing over and out of tank. Never fill gas tank past the first "click" of fuel nozzle, if nozzle is automatic.

DRIVE ECONOMICALLY

1. Never exceed legal speed limit. Primarily they are set for your traveling safety, however better gas efficiency also occurs. Traveling at 55 mph give you up to 21% better mileage when compared to former legal speed limits of 65 mph and 70 mph.

2. Traveling at fast rates in low gears can consume up to 45% more fuel than is needed.

3. Manual shift driven cars allow you to change to highest gear as soon as possible, thereby letting you save gas if you "nurse it along". However, if you cause the engine to "bog down", premature wearing of engine parts occurs.

4. Keep windows closed when traveling at highway speeds. Open windows cause air drag, reducing your mileage by 10%.

5. Drive steadily. Slowing down or speeding up wastes fuel. Also avoid tailgating - the driver in front of you is unpredictable. Not only is it unsafe, but if affects your economy, if he slows down unexpectedly.

6.Think ahead when approaching hills. If you accelerate, do it before you reach the hill, not while you're on it.

GENERAL ADVICE

1. Do not rest left foot on floor board pedals while driving. The slightest pressure puts "mechanical drag" on components, wearing them down prematurely. This "dragging" also demands additional fuel usage.

2. Avoid rough roads whenever possible, because dirt or gravel rob you of up to 30% of your gas mileage.

3. Use alternate roads when safer, shorter, straighter. Compare traveling distance differences - remember that corners, curves and lane jumping requires extra gas. The shortest distance between two points is always straight.

4. Stoplights are usually timed for your motoring advantage. By traveling steadily at the legal speed limit you boost your chances of having the "green light" all the way.

5. Automatic transmissions should be allowed to cool down when your car is idling at a standstill, e.g. railroad crossings, long traffic lights, etc. Place gear into neutral position. This reduces transmission strain and allows transmission to cool.

6. Park car so that you can later begin to travel in forward gear; avoid reverse gear maneuvers to save gas.

7. Regular tune-ups ensure best economy; check owner's manual for recommended maintenance intervals. Special attention should be given to maintaining clean air filters... diminished air flow increases gas waste.

8. Inspect suspension and chassis parts for occasional misalignment. Bent wheels, axles, bad shocks, broken springs, etc. create engine drag and are unsafe at high traveling speeds.

9. Remove snow tires during good weather seasons; traveling on deep tire tread really robs fuel!

10. Inflate all tires to maximum limit. Each tire should be periodically spun, balanced and checked for out-of-round. When shopping for new tires, get large diameter tires for rear wheels. Radial designs are the recognized fuel-savers; check manufacturer's specifications for maximum tire pressures.

11. Remove vinyl tops - they cause air drag. Rough surfaces disturb otherwise smooth air flow around a car's body. Bear in mind when buying new cars that a fancy sun roof helps disturb smooth air flow (and mileage).

12. Auto air conditioners can reduce fuel economy by 10% to 20%. Heater fan, power windows and seats increase engine load; the more load on your engine, the less miles per gallon.

13. Remove excess weight from trunk or inside of car - extra tires, back seats, unnecessary heavy parts. Extra weight reduces mileage, especially when driving up inclines.

14. Car pools reduce travel monotony and gas expense - all riders chip in to help you buy. Conversation helps to keep the driver alert. Pooling also reduces traffic congestion, gives the driver easier maneuverability and greater "steady speed" economy. For best results, distribute passenger weight evenly throughout car.

15. During cold weather watch for icicles frozen to car frame. Up to 100 lbs. can be quickly accumulated! Unremoved snow and ice cause tremendous wind resistance. Warm water thrown on (or hosed on) will eliminate it fast.

EXTRA TIPS

Use public transport ........

originally written by Ernest Miles, modified by Explorer


Friday, 25 July 2008

Tips: How to use the emission test result

Most of the people think that the emission test is for pollution control, it is true, however the engine condition can also predicted from the emission test result. Herewith some of information that we can get from the emission test result (base on EURO II spec) :

CO content (maximum 2.5%)
CO content is depend on mixing composition between air and fuel. If the result more than 2.5%, check the following:
  • Air filter, probably dirty
  • Throttle choke, clean it from carbon deposit
  • Adjust the air-fuel mixing in the carburetor or check the CO sensor for an fuel injection engine.
  • If your car still using carburetor, clean the intake.
  • Check and clean the injector

HC (Hydro Carbon) content, maximum 400 ppm
This one related to combustion process. If the result exceeds 400 ppm, try the following step:

  • Check the spark plugs, spark plug cables and ignition coil
  • Check and adjust the spark timing, advance timing could rise the HC content.
  • Measure the combustion chamber compression (with compression meter), if the result lower than it should be (read the vehicles manual), probably there is a leak in compression.

O2 (Oxygen) , 0.5 – 2 %

The O2 is burn during combustion process, so the test result should be as low as possible. If higher than 2%, it sign of leaking in exhaust system

  • Check the muffler condition
  • Check exhaust manifold gasket for leak
  • Check the exhaust pipe connection for leak

CO2 (Carbon dioxide), > 12%
A perfect combustion will produce high CO2 with little bit water. If the CO2 content lower than 12%, we can suspect some problems:

  • The composition of air and fuel mixture was not balance, too rich of fuel or lean of fuel.
  • Compare the CO2 result with HC and CO results.

Lambda 0.95 – 1.05
Lambda is a number showing the mixture of air and fuel. Lambda 1 is perfect number, that mean the mixture is 14.7 (air) : 1 (fuel). If the Lambda more than 1.05 , that mean fuel percentage less than it should be, the engine will knocking, less power and tend to be overheat. If the lambda number less than 0.95, the fuel consumption tends to be higher.

Tips: Cooling System, problem symptoms and solution

  • The engine temperature rise when the AC turn off. Check the thermoswitch, probably not normally functioning, the cooling fan only run when the AC turn on.
  • The temperature rise in high speed. Radiator clogging, go for service or replace with a new one.
  • The engine still cold even for long distance. The thermostat valve always open, replace the thermostat.
  • Coolant fluid decreasing constantly. Probably leaking, observe the cooling system (radiator, hoses, reservoir, engine) while engine running, find the leaking location.
  • Reservoir full of coolant, and less coolant in radiator. Probably cause of abnormal function of radiator cap, change the cap.
  • Bubbles in radiator while engine runs. Compression leaking, can be in the cylinder head gasket, or water jacket. Go to the workshop immediately for complete diagnose and repair.
  • Coolant fluid mix with oil (like a milkshake). Warning!! This is a serious condition, it could be leaking in cylinder head gasket, water jacket or transmission oil cooler. Drain all fluid immediately (coolant and engine oil). Small amount of water can start rust inside the engine.
  • Dirty coolant fluid (brown). Rust inside cooling system. Change the coolant fluid, put a radiator flush before drained.
  • The cooling fan always running in any temperature condition (for engine powered fan). Check the viscous coupling.
  • Temperature rise in slow speed or traffic jam. Check the electric fan, check the wiring.

Tips: Cooling System, parts and potential problems

Vehicle cooling system works basically is simple: to absorb the heat produced by combustion chambers by circulating fluid inside the engine. After absorbed heat in the engine, the coolant fluid circulated to radiator for releasing heat and as result the coolant temperature goes down.


The cooling system parts and its potential problems.

  • Radiator coolant. Water can act as coolant fluid, however the water boiling point is not to high compare to engine temperature, and in other hand, a poor quality water can produce rust inside cooling system. Normally, a modern car use a special coolant fluid, this fluid has higher boiling temperature and will not make rust or corrosion inside cooling system. Inspect the level of coolant fluid regularly. Replace the coolant fluid as required in your vehicle owner manual.
  • Radiator. Is the place for the coolant fluid to release the heat. Most of modern car radiator made by aluminum. Clean the radiator surface regularly, especially after crossing a muddy road.
  • Radiator Cap. Radiator cap act as a valve triggered by pressure, normally 0.7 or 0.9 bar. That mean the valve will open above the above pressure number and the fluid will flowing from radiator to the circulation reservoir. If you find the reservoir if full and the fluid is not back to the radiator when the engine is cold, that indicated the radiator cap not functioning normally.
  • Radiator Fan / Cooling Fan. There are two types of radiator fan, first the electric powered fan, and the second is the engine powered fan. The electric fan controlled by thermoswitch, as a sensor of coolant fluid temperature. The engine powered fan normally equipped with viscous coupling. The engine powered fan it self is rarely broken, most of the time the problem came from the viscous coupling. Far the electric powered fan, the problem can be arise due to fan motor damage or the thermoswitch is not functioning.
  • Water pump. To circulate the fluid from the radiator to the engine vice versa normally use an engine powered water pump. Some times the water pump seal worn and leaking, it will cause loosing fluid and engine temperature increase due to slow/less circulation or pressure build by the pump.
  • Thermostat. Thermostat working as a one way valve that start opening in certain temperature (87 – 96 deg C). This part will keep the engine work in optimum temperature (not to low).
  • Radiator hose. This hose connected the radiator and the engine. Usually there are two hoses, in and out from the radiator. The hose quality will decrease by time, become harder and at certain point will broken. Check your radiator hoses regularly, especially if your car have been use more than 3 years.
  • Reserve Reservoir. Observed for leaking.
  • Water Jacket. Water jacket is a small hole for circulating fluid around engine block.
  • Cylinder head. The water jacket also goes through cylinder head. A leaking can be occur around the cylinder head gasket or in the wall of the cylinder head itself. This leaks could be triggered by overheat.
  • Oil cooler. Automatic transmission car equipped with oil cooler. Some times this cooler is leaking and the oil mixed with water. It is a serious condition, the water can hammered the piston.

Thursday, 24 July 2008

Tips: Engine Oil Color

Knowing engine damage earlier could prevent issuing more cost. Can you imagine if the car overhead because its lubricant decreased, continued running on the road? Possibly all the rubbing component will be damage.

To know the engine condition, evidently could be detected through the color of the engine oil. The change in the color of engine oil could determine whether the component inside was still healthy or already have much damage. Engine oil color observation could give us a preliminary diagnostic of the engine condition.

Yellow (clear and transparent)
This is a new oil color, or new oil pouring to the engine. The engine has not start yet or just start for short time.

Brownish Yellow
The engine had been used to go. The condition was still being considered to be normal, probably the car have been used for 1.000-2.000 km. Did not need the change.

Black
Engine oil was black as a result of the car has gone around 3.000-4.000 km. Better be replaced with that was new when the interval have been reach, maximal the use normally around 5.000 km up to 10,000 km (depend on engine oil specification) . More than that, interval the engine temperature could be raised due to poor oil quality and as a result could damage the engine component. If the engine oil became black only after few weeks or short distance, it could be a problem inside the engine. The problems might be caused by amount of sludge especially for vehicles that use for more than 5 years. Engine flushing is recommended for this type of problems.

Dirty Black

This color indicated that the engine oil was mixed with oil sludge and metal component as result of engine component friction. It is a danger warning sign, the engine component and lining probably have been worn. Try to change the oil immediately, if the results still the same, inspect the engine interior component, probably needs an overhaul.

Milky Brown
This is resulting from oil mixed with water. It can be happen for several causes i.e:

  • Leaking top head gasket
  • Leaking/damage oil cooler
  • Or improper oil filter installation

This milky brown color is a serious warning indication. Do not start the car (can cause a water hammer), drain all fluid (oil and coolant) from the engine immediately. Late action can cause rust developed inside the engine. See my previous posting about water inside the engine.

So, what are you waiting for? Check your engine oil color.

Tips: Cleaning Your Car Wheels

Have you washed your car correctly, clean and dry? Most off us will answer, yes. Probably not for the wheels. This component usually have many indentations and bars. If not thorough, many parts that were not yet dry and if being left for long time will be spotty, fleck, or might be fungus.

During cleaning, the dirty area most often was seen around nipples and the wheel interior, As a result the waste and dirty fleck built up in this place. To eliminate this we can use soft white compound, or using a especially anti fungus for wind shield to clean the wheel dirty spot.


This time I’m writing tips for using ant fungus liquid for the windshield as a wheel cleaner. The process of the removal of the fast fungus and the price of the liquid was not too expensive. Lets start clean your wheels:

  • Poured the liquid to the soft brush.
  • Quick wore to the wheel. Continued brushing until foamed. Note: this liquid should immediately wipe before it dried.
  • Do not apply the liquid too much, it is a strong chemical compound, it can damage the wheel varnish
  • After the foam change to brown or was seen dirty, stop applying the liquid, and wipe the cleaning area until dry.
  • Wash the wheel with clean water to remove all dirt and the anti-fungus liquid, then dried the wheel with clean cloth.
Note: the anti fungus liquid for wind shield is a strong chemical compound, wear your safety glove and glasses when worked with it.

Turbo for all Mercedes Benz line-up

All Mercedes-Benz line-up will use the machine turbocharger within two half of the year in the future. This assurance was sent by the member and the development of the research council of Daimler, Thomas Weber, on Thursday (17/7), in Dusseldorf, Germany.

“We will install the machine turbocharger to all of our vehicle product as soon as possible before the year end 2010,” revealed Weber.

This decision, was said by Weber, was part of the effort of Mercedes-Benz was free from the pressure the increasingly high regulation of the limit of vehicle emissions that

immediately will put into effect in Europe and the United States. To be learnt, during 2012 Europe planned to carry out the reduction in the emissions threshold from 178 gram per kilometer to 138 g/km.

Beside rumors of emissions, the market request would the increasingly big vehicle of the energy opinion also provided a basis for the new strategy of this Mercedes-Benz. According to Weber, now the consumer needs the method was cheapest overcame the height of the price of the fuel.

Therefore, Weber considered the increase turbocharger became the appropriate choice. Apart from being easy to be installed, the device turbocharger did not increase the vehicle weight significantly. Now with turbocharger the efficiency profit and the increase in the performance of the vehicle could be maximized. Weber also explained that the first step in his side faced the emissions pressure and the price of the increasingly high oil will be followed by the middle stage strategy. In this stage of Mercedes-Benz will speed up the mass production of the vehicle hybrid. His step personally immediately will be realized when the sale of the premium sedan of S-class hybrid in began in 2009.

While responding to the long-term plan the German government appointed zero-emissions in his country, Weber confirmed Mercedes-Benz also was ready in this condition. In order to faces this demand of Weber said his side prepared the technology vehicle fuel cell and the electric power. During 2010, for example, Smart— Mercedes-Benz alliance —will began produce the mini vehicle ForTwo electric powered vehicle.

Tips: Buying A New Car

Most of people who wish to buy a new car have a clear picture in their mind of the type of car that they want, or at the very least some idea of whether they want a saloon or a hatchback. However by the time they have visited the showroom they can leave the driving court away with something very different from what they envisaged. The reason behind this could be the salesman persuading you away from what you know is the right choice or you simply buy on impulse only and then realize your mistake later.

Here are some practical tips to help ensure you don’t make a big mistake when it comes to purchasing your car.

  1. The size of the car; factors to take into consideration here are the size of your garage. If you have a family then purchasing a small two seated model is probably not the right choice. The same applies if you have limited space as then you aren’t going to be able to fit a big car into it. The size is also determined by the build you are, for example if you are a tall person then you will have to ensure that you have adequate room.
  2. The car purposes. Are you going to be towing a caravan or attaching a trailer to it on a regular basis? If you are then you should consider a car with a bigger engine such as a four wheel drive. If you only want something to run about in the city then your choice might be better suited to a smaller hatchback model. The car you choose should fit in with your lifestyle.
  3. Insurance cost. The size, make and model of the vehicles are all factors that are taken into consideration when it comes to determining the quote for your premium for the car insurance.
  4. Type of fuel, you have the choice of going for a petrol or diesel model; there are many advantages to choosing a diesel model rather than petrol. The diesel engine is considered to be more reliable and the fuel is more economical. However there are bad points too and these include the engine of the car being worked harder which means a major overhaul.
  5. The last important one, consider the budget and the car prices range.

Friday, 18 July 2008

Mitsubishi Pajero

I post this article originally for my other blog the 4WD-fourbyfour.blogspot.com , however I think this article also relevant for this blog.

The Mitsubishi Pajero is a sport utility vehicle manufactured by Mitsubishi Motors. It is known as the Mitsubishi Montero in the Americas and Spain, and as Mitsubishi Shogun in the United Kingdom. In this post I would like to discuss the third generation Shogun/Pajero (1999 - 2006) with 3.2 liters diesel engine.


Mitsubishi Pajero is one of few real off-road workhorses, in the market it has competitors like Toyota Land Cruiser, Nissan Patrol and Jeep Grand Cherokee. Although the has superb exterior and interior design, Pajero can’t compared to the premium brand likes Range Rover or BMW X5, Pajero is thougher, real workhorse with bullet proof engine.

Pajero brief fact:
- Engine: 3200 cc four-cylinder diesel
- Output: 158 hp at 3800 rpm
- Torque: 275lb ft at 2000 rpm
- Transmission: 5 speed auto
- Fuel consumption: 26 MPG
- Weight: 2155 kg
- Top speed: 106 mph

Engines and Performance
The Pajero 3.2-litre direct injection diesel produce 158 bhp and 275lb ft torque. Although the power is slightly less than its competitor, however the high torque made Pajero is more flexible. The engine bit noisy, especially from the outside. While power is on the low side, the engine delivers tons of torque at under 4000 rpm, good for off-road driving and climbing steep grades. Fitted with Mitshubishi’s new INVECS-II five speed auto transmission, the Pajero has optional fully automatic mode or sequential manual shift. The quality of the automatic change reduces the temptation to use the manual option, although it can come in handy for accelerating hard out of junctions. The manual changes would benefit from being less hesitant.

Ride and Handling
In the asphalt road Pajero is quick and comfortable, body roll appears during cornering. The steering is good, its accuracy and a relative quick rack helping you make correction off road. As the result of fitting a multi link rear axle, Pajero lack of ground clearance. The traction system was rarely problem. The four-wheel drive system is switchable, operating as rear-wheel drive under normal conditions. The Pajero off road capability slightly less than its competitor Toyota Land Cruiser. The Pajero's soft suspension is generally forgiving and smooth on the highway. Road feel is never very lively in 4x4s, but the Pajero's rack-and-pinion steering is a big improvement over the previous model's setup. Road and wind noise make an appearance at moderate highway speeds. Cornering response is predictably ponderous, with pronounced side-to-side roll. Let's just say cornering quickly with the Pajero is not a very good idea. The Pajero features big ventilated disc brakes front and rear, necessary to haul this truck down from highway speeds, and they work adequately well in conjunction with ABS.

On rippled gravel surfaces, the Pajero exhibited little bounce thanks to the Pajero's fully independent suspension. Mitsubishi's compliant springs and shocks soak up most of this motion, producing a very smooth ride during mild offroading. Mitsubishi also does away with the classic body-on-frame construction of most 4WDs and opts for a unit body construction. This generation of the Pajero is the first to be built on a unit body, ditching the older body-on-frame design while also leading to a stronger structure that does not rattle over bumps. On really steep descents and climbs, the Pajero's torquey V6, low-range transfer case and brakes work together superbly, allowing good control when going downhill and providing plenty of torque for climbing back up.

Interior and Driving environment
The cabin is not complicated, is comfortable, robust and roomy. The quality is moderate. Pajero has seven seats. The third row of seats fold out of the floor, a neat system that creates valuable spaces when the seats are not in use. The shogun’s boot is narrow and tall, although with the rear seat folded it’s more usable. Driving position is good, visibility is excellent. The design of centre console is modern, however the fake wood in the dash look ugly. The Pajero dials composition and design is out of date.

Tuesday, 15 July 2008

LWB or SWB 4WD?

After 20 years using various 4WD vehicles in various terrain, a basic question arise; which one better, short wheel base (SWB) or long wheel base (LWB) 4WD?

1. In muddy road:
A light weight short wheel base vehicle like Suzuki SJ410 is the best for this kind of terrain. The Suzuki will “float” above the mud. Some times a medium weight long wheel base vehicles like Defender 110 or Daihatsu Taft Hiline LWB are also good for this road. The muddy road condition is always not homogen, the opportunity to get hard ground is better with a long wheel base 4x4. The full size 4x4 likes Toyota Land Cruiser and Nissan Patrol will become the first vehicle stuck in the mud.

2. Gravel road.
LWB vehicles will give a better ride in this condition as long as the rocky road is not to rough. Riding a SWB 4x4 in this terrain will make your back pain getting worst.

3. Sandy dessert.
Both LWB and SWB are ok for this terrain. If you driving fast, LWB is better, more stable compare to the SWB vehicles

4. Rocky road
In this condition, a SWB vehicles with high departure and overhang angle will give an advantage to pass a rough rocky road. Suzuki SJ410, Wrangler Jeep and Toyota FJ40 will meet this qualification.

5. Steep hilly road.
The stability of LWB vehicles will take an advantage in this condition, especially when downhill.

For myself currently I choose a 4x4 to compromised all terrain above, Jeep Cherokee XJ. The wheel base is not short like Wrangler or SJ410, but still shorter than Land Cruiser or Nissan Patrol. With 32” tire, I can manage almost all obstacles and still feel comfortable while driving.
So, what 4wd vehicles wheel base is good for you?

More articles in 4wd tips are available in my other blog: 4WD-fourbyfour

Wednesday, 2 July 2008

Honda CX500 CDI Schematic (2)

Ok, lets continue my previous post about the Honda CX500 schematic.

As before, this post refer to old posting by George in NC. He made two CX500 CDI prototypes and I've tried to made the second prototypes and its works!!. I made it twice, the first one was works for more than 3 years and the second one works for one years, its failed at the same time with stator/rotor problem (see my first posting about Honda CX500 by clicking here).

And here what George in NC wrote:

Section II: The Prototypes
Prototype 1:
    Properties:
  • it works
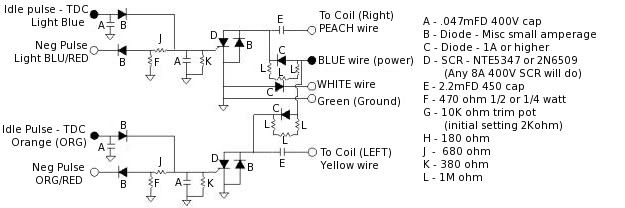
  • it's the simpler of the two
  • no timing advance
  • max revs are roughly 6500-7000rpms
  • bike runs rich when this iginition is used
This one will get you home or make a good test unit, but I wouldn't want to use it as a permanent solution...


This is a good example of Prototype 1. The input leads (LtBlue/Orange) are coming in from the left and the Blue and White leads are coming in from the right. You can see that there are two SCR's (one for each side). You can also see that the two capacitors/sides have thier own power input from the Blue wire lead. There is a diode that you cannot see located under the top brown capacitor. The two electrolytic capacitors are the 2.2mFD 450V capacitors. To the right are the 'C' diodes....


Prototype 2:
    Properties:
  • it works
  • it's the better of the two
  • timing advance
  • max revs are same as original
  • bike runs well when this iginition is used
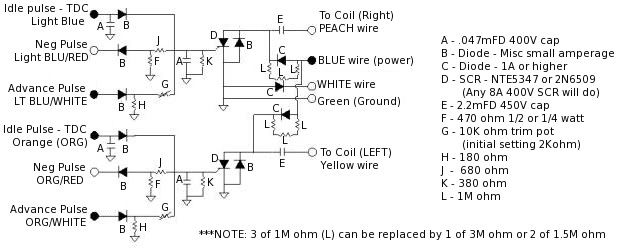
  • this ignition requires tunning of varistor 'G' to work correctly
This iginition is alittle tricky because of the tuning required for it to work correctly. My best suggestion is to use a varistor that is about 2000 ohms and start the bike with it set to 2000 ohms. Once the bike is started, slowly reduce the ohms until the bike starts to falter...then turn the varistor back half the distance. This needs to be done for each side. I have had the varistor at both 0 ohms and 2000 ohms and have had no ill effects to the engine so don't be afraid to play around.

There is one thing I would like to change on this schematic when possible. The 'Positive Supply/Blue' should be the same as in Prototype 1. Each capacitor should have it's own diode resistor set without the connection between the two 'L' connectors.


Here is a pcb board for the whole layout...the one on the left is the whole pcb, the one on the right is just the silkscreen for the actual copper layout (so you can print it off and use it as an overlay).


For those wanting to get a general idea of what to expect price wise, here is a list of components I bought to build the CDI boxes...

These prices are really old data from http://www.digikey.com/ and may have changed. You can check all of that out on their online catalog...
Part # # description Price $US Totals
P5873-ND
2
2.2microF Radial Caps
$0.87
$1.74
E4473-ND
6
.047microF Metal Poly Caps
$0.50
$3.00
E4153-ND
2
.015microF Metal Poly Caps
$0.43
$0.86
470QBK-ND
10
Resistor 470Ohm 1/4Watt Carbon Film
$0.06
$0.56
680QBK-ND
10
Resistor 680Ohm 1/4Watt Carbon Film
$0.06
$0.56
390QBK-ND
10
Resistor 390Ohm 1/4Watt Carbon Film
$0.06
$0.56
2.7MH-ND
5
Resistor 2.7MOhm 1/2Watt Carbon
$0.06
$0.27
1N4004GICT-ND
20
Rectifier 1A 400V DO-41
$0.04
$0.80
S4008V-ND
2
SCR Non-Sensitive Gate 400V 8A TO-251AA
$0.77
$1.54
3306P-103-ND
2
10kOhm 6mm RD CERM ST POT
$0.57
$1.14


Total
$11.03


Handling Charges
$5.00


Shipping
$4.00


Total Invoice
$20.03
eventually swapped the 10kOhm ceramic pot for a 2kOhm variable resistor. The 10kOhm worked fine, but I wanted to use something smaller.
The wires I used for the prototypes was either 20 or 22 gauge solid wire. In fact that is the wire I have been using through this whole process and it seems to work fine. The connectors I use are the standard automotive type and they work as well.
A PCB kit from your local Radio Shack is about 15.00$US and it has most of what you need. The only other thing you might want to get is a set of Radio Shack's stencils for making the diagram/layout on the PCB. They're realitively cheap and make a MUCH better/cleaner board.
There is also the cost of the soldering iron and solder. If you've never soldered before then you need to search on the internet for some sort of tutorial. There are some out there, that's how I learned...that and practice.
Many thanks to Goerge in NC who wrote this article long time ago. I wonder, does anyone know George current e-mail address, it will be nice if we can discuss about honda CX500 with him.

Note: my PC crash last year and I lost the original schematic files, I apoligize can't send bigger picture anymore.


update:
one of this web visitor give a link for the picture, thank you for RHCE V6.....
RHCE V6 said:
Here are the schematics.

1. this is a very basic circuit that will get you running but has no advance so RPMs are limited to ~6K-7K

http://i1186.photobucket.com/albums/z370/rhcev6/CX500CDI/NO-Advance.jpg


2. this is the full CDI with advance cuircuit. You can set the trip pots initially at 2Kohm and then adjust as needed above 6K RPMs

http://i1186.photobucket.com/albums/z370/rhcev6/CX500CDI/Full-CDI.jpg